Reception Queue
The reception queue is today’s list of booked and checked-in patients at one clinic location. Find it at Scheduling → Queue (/queue). Receptionists and Clinic Admins run it. Doctors and nurses see a shorter view of their own work.
Who can do this
| Task | Clinic Admin | Receptionist | Doctor | Nurse |
|---|---|---|---|---|
| See today’s queue | Yes | Yes | View only | View only |
| Check a patient in | Yes | Yes | No | No |
| Call a patient to a room | Yes | Yes | No | No |
| Route a patient to a stage, or mark payment | Yes | Yes | No | No |
| Assign or change the doctor | Yes | Yes | No | No |
| Cancel an appointment, mark a no-show, or reopen | Yes | Yes | No | No |
| Arrange a session for the patient | No | No | Yes | No |
| Complete the visit and send the outcome | No | No | Yes | No |
| See the CHAS badge and select Verify now (Singapore) | Yes | Yes | Yes | Yes |
Doctors see only the patients assigned to them. Nurses see every patient at the location and open the vitals form from their own view. The Arrange session and Complete visit buttons appear on a doctor’s row only after a consultation has been started for that appointment.
Reading the queue
The page header shows the location, today’s session with an Open or Closed badge, how many doctors are on duty, and a Self check-in code. If nobody has opened a session yet, it says No session yet today. Select Create session to open one, or see Session Setup.
The table lists patients in this order:
- Patients reception has moved to a fixed place in the queue.
- Patients who have arrived, earliest arrival first.
- Patients who are booked but have not arrived, by appointment time.
- Completed and cancelled visits, at the bottom.
Each row shows the ticket, the time, the patient, the reason, the doctor, the workflow controls, and the status.
| Status | What it means |
|---|---|
| Scheduled | Booked, not yet checked in. |
| Waiting | Checked in and waiting. |
| Consultation | A consultation has been started for this appointment. |
| Done | The visit is finished. |
| Cancelled | Cancelled or marked as a no-show. |
The page updates itself about every four seconds, and the line under the title shows when it last updated. Nobody needs to reload it. Select Refresh to update it at once.
Four filters narrow the list: the location, the doctor (All doctors, Unassigned, or one doctor), the stage (All stages, Not yet routed, or one stage), and the status (Active (hide Done), Waiting only, Show cancelled, or All).
Checking a patient in
- Choose the location at the top of the page.
- Find the patient’s row and select Check in.
A message such as “Kamala Perera checked in” appears, with the ticket number and the doctor, for example “Ticket #1 · Marcus Lim”. The row now shows the ticket and the status Waiting.
Check-in records the arrival time, gives the patient a queue ticket from the location’s open session, and assigns the next doctor marked active in Session Setup. Doctors take turns in the order they were marked active. If no doctor is marked active, the patient still gets a ticket but no doctor. Checking in a patient who already has a ticket keeps the same ticket and does not move the rotation on.
Check-in has no time window. A patient booked for later in the day can be checked in as soon as they arrive.
Patients can also check themselves in from the patient portal. They either share their location or type the six digit Self check-in code shown in the page header. A self check-in works like a staff check-in, and the row appears in the queue with a ticket.
CHAS verification at check-in (Singapore)
For a Singapore organisation that subscribes to CHAS, checking a patient in also asks MHCP for their CHAS card. This happens on the first check-in of the appointment, from the desk or the portal, at a location connected for CHAS. Nobody has to press anything. Verification never blocks check-in. If it fails, the patient is still checked in.
The result shows on the CHAS badge under the patient’s name in their chart. Every role sees it. The badge shows one of:
- the card’s name
- CHAS not verified
- No CHAS card
- the card name followed by expired
For a valid card, the badge also shows when it is valid, the chronic tier, the chronic and acute balances for this year, and the visits left at this clinic. “checked” and a date and time, in Singapore time, show when MHCP was last asked.
Select Verify now on the badge to ask MHCP again. Any role can. Medbot asks at the clinic of the patient’s visit in today’s queue session. If the patient is not on today’s queue, it asks at the organisation’s default location. A successful check says, for example, “Verified at Main Clinic.” A failed one says why and changes nothing else:
| Message | What to do |
|---|---|
| ”Not verified: the patient has no Singapore NRIC (S or T) recorded.” | Record the patient’s NRIC in their chart. See Patient Records & Consent. |
| ”Not verified: … is not connected to SmartCMS for CHAS. It needs an HE code and CHAS switched on in the SmartCMS settings.” | Ask a Clinic Admin to finish the location’s SmartCMS settings. |
| ”Not verified: SmartCMS is switched off on this Medbot server.” | Nothing is sent from this server. Contact Medbot. |
| ”Not verified: the patient’s details could not be sent to MHCP. Check the NRIC.” | Correct the patient’s NRIC, then select Verify now. |
| ”Not verified: MHCP’s answer could not be read. Try again later.” | Select Verify now later. |
| ”Not verified: the SmartCMS gateway did not accept the call from Main Clinic. Try again later.” | Select Verify now later. |
When you bill the visit, the CHAS panel warns if the card is not verified, was verified more than 30 days ago or in an earlier year, or is not valid on the visit date. MHCP is asked again when the bill is issued. See Claims Workflow.
Calling a patient to a room
- On a checked-in row, select Call.
- Choose a room in Choose a room, then select Call.
A message such as “Called MAIN001 to Consult 1” appears, and the row shows Called → Consult 1. Only rooms set up for today’s session are listed. The waiting room display shows the ticket and the room, and a room door screen shows the ticket for its own room. See Patient-Facing Displays. The room label stays until you route the patient to another stage.
Assigning the doctor
Use the doctor menu on the row to change the doctor. A doctor chosen by hand shows Manual. A doctor chosen by the rotation shows Auto-rotated.
Routing a patient and marking payment
The Route… menu on a checked-in row moves the patient through the clinic: Nurse, Doctor, Investigations, Dispensary, Completed. Use it to show where the patient is. The nurse’s own view shows a patient routed to the nurse as Vitals now, and a patient routed on to the doctor as Ready for doctor.
Select Mark paid to record that the patient has paid. The button then reads ✓ Paid. Select it again to undo it.
Cancelling, marking a no-show, and reopening
- Select the ellipsis button on the row.
- Choose Cancel appointment or Mark no-show, then confirm.
The patient leaves the active queue. To find the row again, set the status filter to Show cancelled. Select Reopen to put the patient back. A reopened patient gets a new ticket and a new place in the queue.
What the doctor and nurse see
A doctor opens Today’s Patients. Each row has Start consultation, which opens the patient’s chart at Encounters for that appointment, or Continue consultation once one has started. If the visit already has an open encounter, Medbot reuses it rather than starting a second. See Encounters & Clinical Notes. A nurse opens Today’s Queue, and the Vitals button on each row opens the vitals form. See Vitals. Neither role can check patients in, change the doctor, or call a room.
Arranging a session and completing the visit
Once a doctor has started a consultation for an appointment, two buttons appear on that row.
Arrange session offers the patient an assistant session for this visit. Choose Financial counselling or Health education, add a Reason (shown to the patient), and select Arrange session. The row then shows a badge with the session type. The patient starts the session from the portal, and does not need to be enrolled in a service. See Patient Portal.
Complete visit finishes the visit and sends the outcome to the patient.
- Select Complete visit.
- Optionally select Generate draft to have the assistant propose the text from the visit. Check and edit everything it writes.
- Write the Findings in words the patient can read.
- Under Medicines started, select Add and enter the medicine name and the dose and instructions.
- Under Next steps, select Add, then choose Follow-up appointment, Advice, or Test result and describe what the patient should do. Any session you arranged already appears as an AI session step.
- Turn on Also notify the patient by SMS if you want a text message as well.
- Select Send to patient.
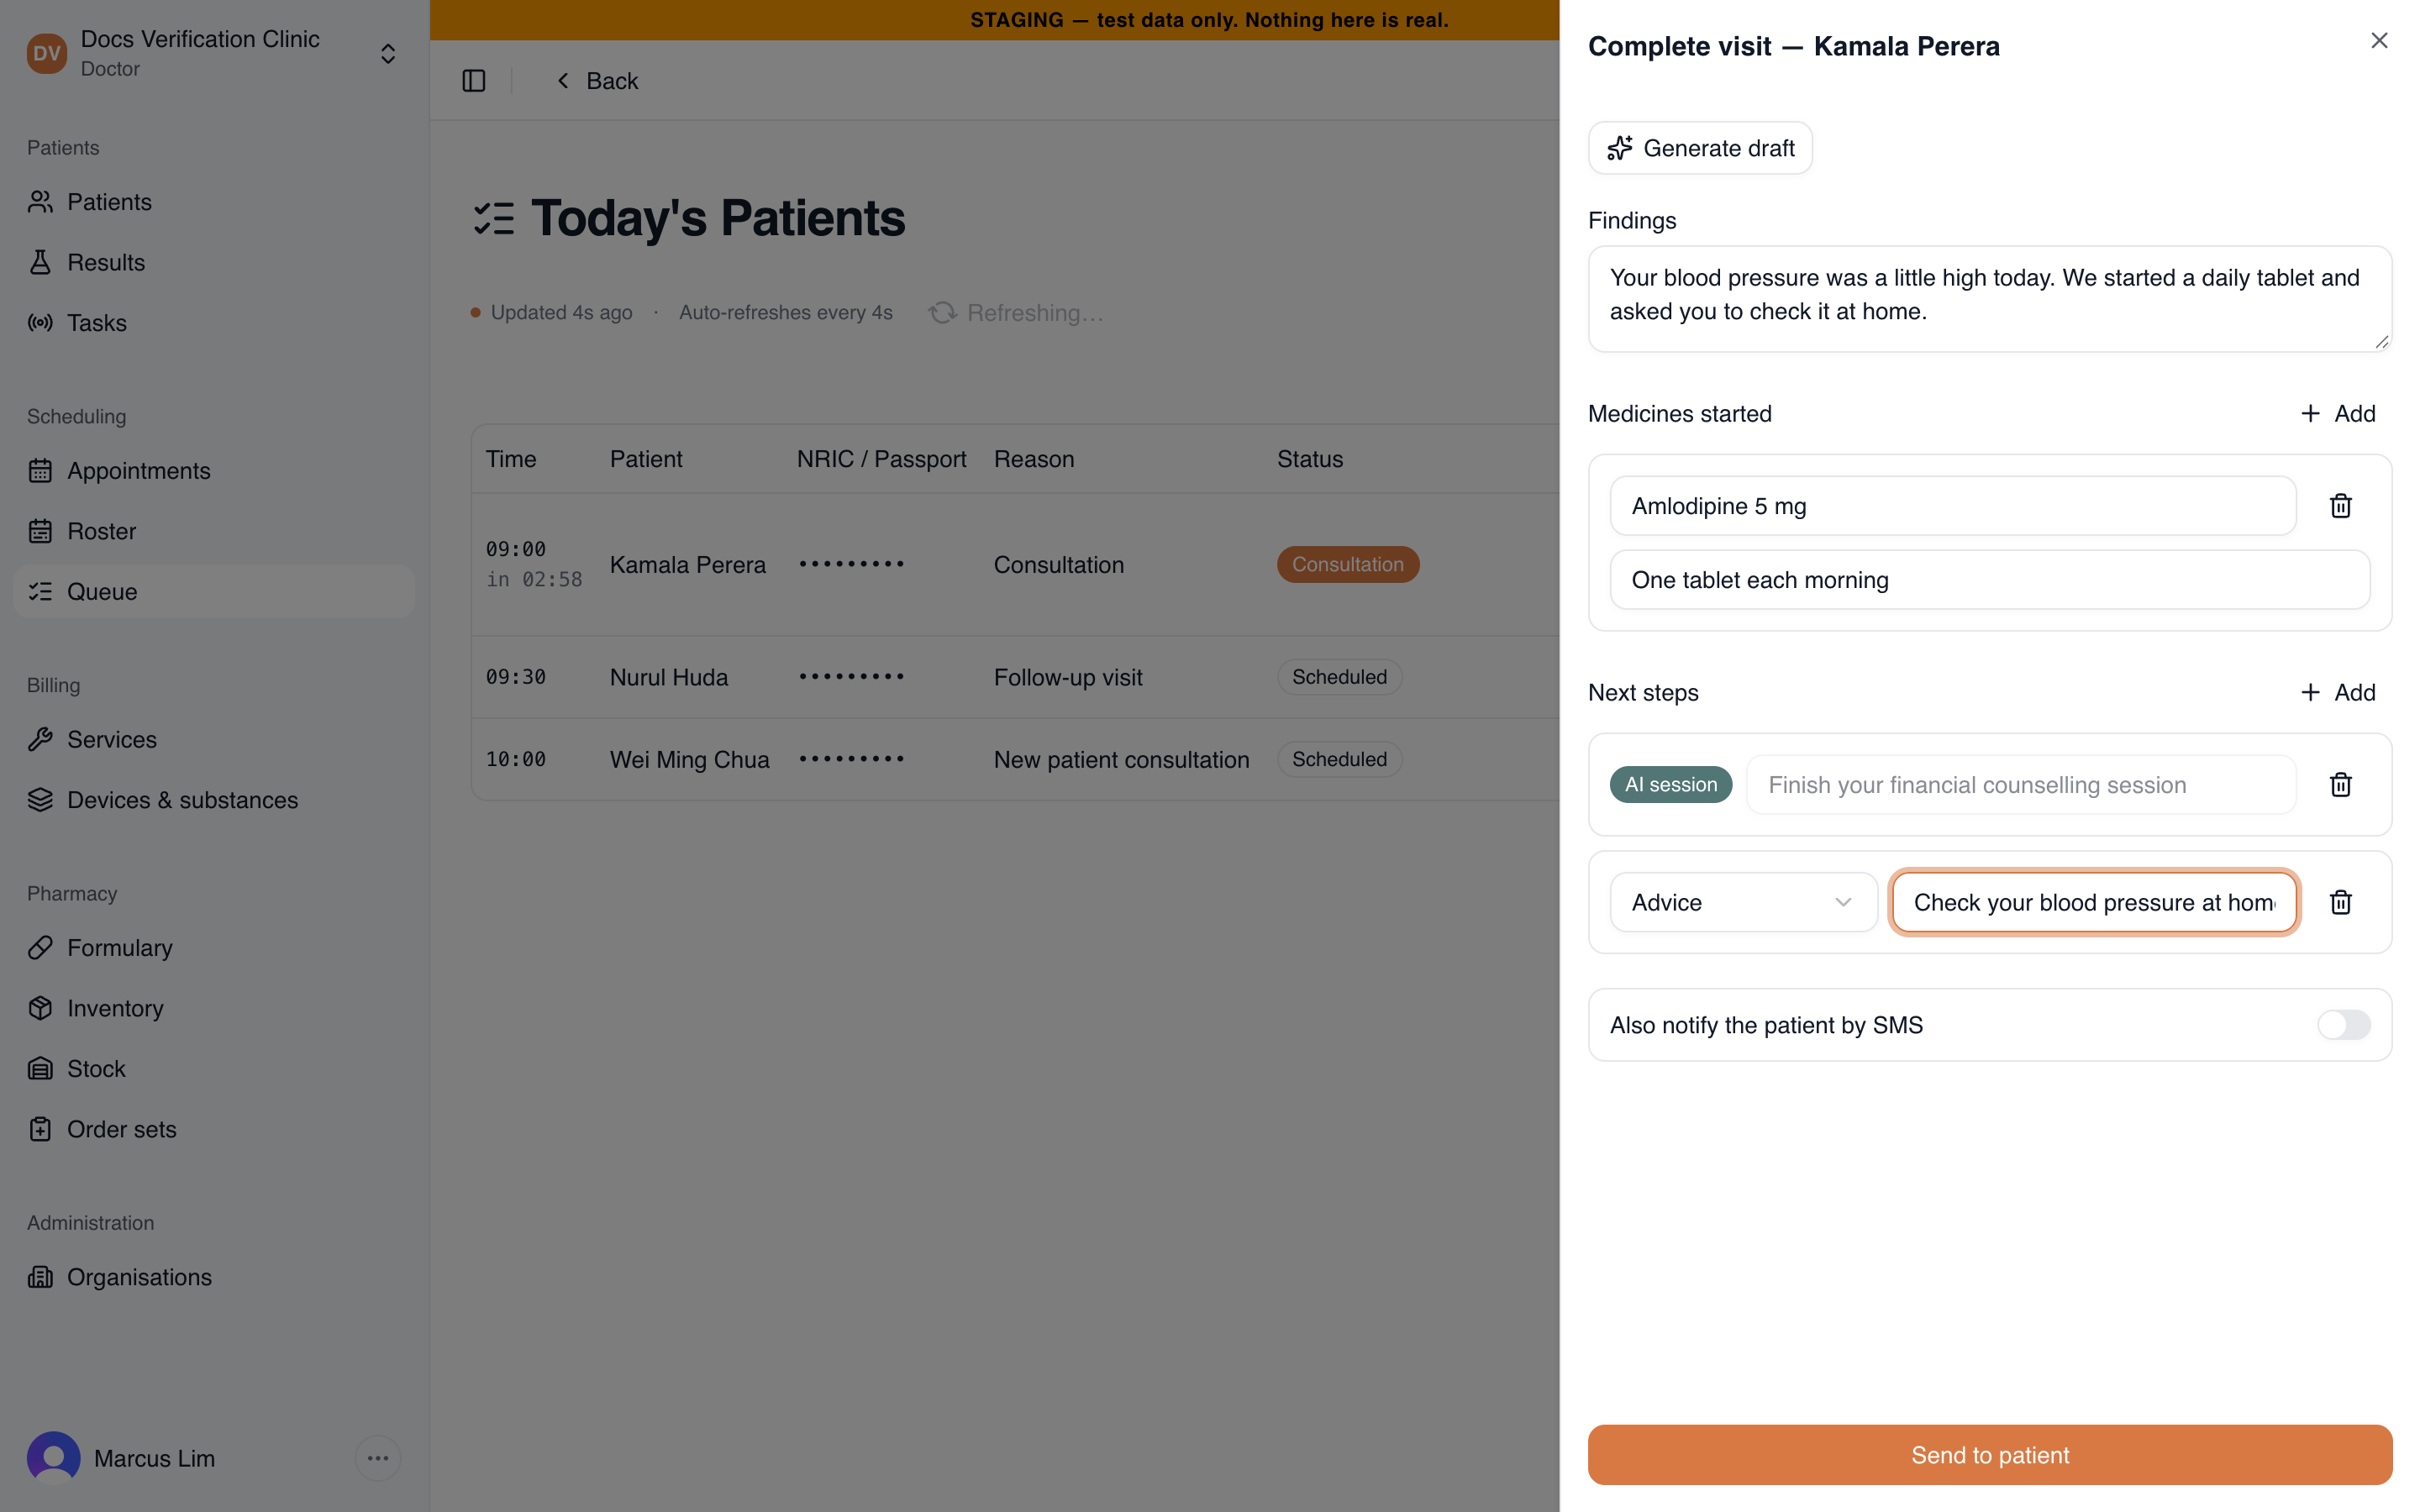
The Complete visit panel
The outcome goes to the patient’s portal, and the row leaves the active list. Sending the outcome cannot be undone from the queue, so read it through first.
Related
- Session Setup: open the session and choose which doctors take patients.
- Patient-Facing Displays: what the waiting room board shows.
- Appointments: book the visits that appear here.